
Scratch is a great way to introduce children to programming. It has relatively few concepts that need to be mastered before they can begin exploring and creating by themselves. Most kids really love having this kind of platform to express their creativity.
In this lesson we're going to be teaching concepts of:
Each child should have their own computer. There should ideally be one lab assistant per every 10 students or better. This lesson is expected to take between 75-90 minutes.
We're going to introduce the basic parts of the Scratch language and then we're going to build a short "skit" using the language. This will lay the foundation for the second part of the lesson.
The skit we're going to use in this lesson can be customized without making it too difficult for the teachers and lab assistants. The skit consists of a small amount of backstory, a journey, and an ending. While going through this skit we will explain how the blocks work together and the Children should get a pretty good grasp of how the Scratch environment works.
It may be helpful to explain that while you (the presenter) are talking, they need to stop working on the computer and give you their full attention.
Ask: How many of you have ever been to a play or a musical?
Review the different elements of the play like the stage, backdrops, actors, costumes, props, etc. Show that in scratch we use these same concepts. The Stage is the where everything happens. The Actors (also called a Sprite) move around the stage and can have dialog. The backdrop is a background on the stage.
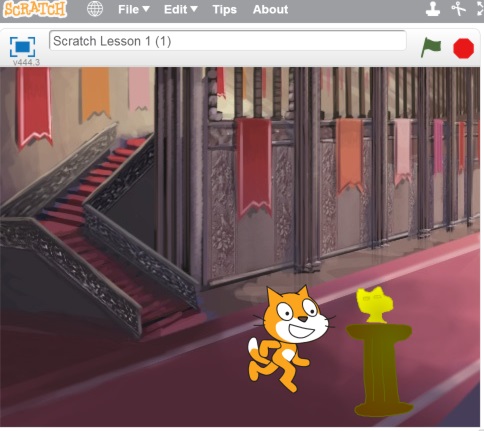
We're going to send Scratchy (the cat) on a quest for the Golden Kitty!
Lab – Step 1: Open Scratch 1. Open a web browser and navigate to http://scratch.mit.edu
2. Select "Try It Out"
There is no need to create an account. You can download the skit from the file menu and save it to an external storage device.
This lab should take approximately 2-5 minutes.
Let's start our quest in Scratchy's bedroom. Click on the Stage icon next to the sprites in the Sprites section. Then select the Backdrops tab in the main section. On backdrop1, press the "Choose backdrop from library" button. Then choose the Indoors -> Bedroom 2 backdrop.
Once the backdrop is in place we want to show that Scratchy can be dragged around the stage and when we do that the X and Y position of the Scratchy Sprite changes. Drag Scratchy into the bottom left hand corner.
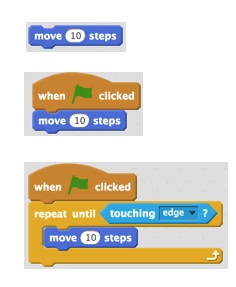
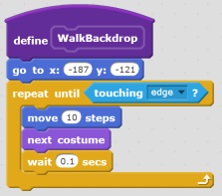
Open the Scripts tab and move over the Motion -> MOVE 10 STEPS block into the scripts area. When we click this block Scratchy will move forward a little bit each time it is clicked.
Let's start our quest in Scratchy's bedroom. Click on the Stage icon next to the sprites in the Sprites section. Then select the Backdrops tab in the main section. On backdrop1, press the "Choose backdrop from library" button. Then choose the Indoors -> Bedroom 2 backdrop.
Once the backdrop is in place we want to show that Scratchy can be dragged around the stage and when we do that the X and Y position of the Scratchy Sprite changes. Drag Scratchy into the bottom left hand corner.
Open the Scripts tab and move over the Motion -> MOVE 10 STEPS block into the scripts area. When we click this block Scratchy will move forward a little bit each time it is clicked.
We typically don't want to run our program that way so we want to drag on the When Start Clicked from the Events section. We snap our MOVE 10 STEPS block onto the WHEN START CLICKED block.
Now when we press the start button (the flag at the top of the stage) it will run our script and move forward a little. Just like it did when we double clicked it. We want to get Scratchy all the way to the other side. If we add a REPEAT UNTIL with a TOUCHING EDGE condition.
When you press the flag, Scratchy will move across the screen to the other side. He looks a little funny though. Let's make it look more like he's walking.
Core Concept: Explain that looping, like we did here, is one of the main aspects of programming and is a requirement for a computer to be Turing Complete; along with branching (conditional statements) and simple math. A computer that is turing complete can run any complex sequence designed to solve a problem. We call these complex sequences algorithms.
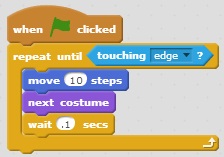
Open the Costumes tab in the main content area. Notice that Scratchy comes with two costumes by default. If you switch back and forth between the costumes, it looks like he is walking by simply adding the NEXT COSTUME block inside of our repeat block. The Next Costume block is found in Looks in the Scripts tab.
Now when we run the sequence, scratchy appears to be running like crazy for the other edge of the screen. He is not going to be able to run all of the way to the treasure so we'll want to slow him down a bit. Add a WAIT .1 SECS block into the body of our repeat block. We should now have something that looks like this:
When we position our sprite on the left of the screen (being careful not to touch the wall) and we press the start flag, our sprite should appear to walk to the other side and then stop. It would sure be nice to have him reset to the start of the screen automatically when we press the start button, so let's place him about where we want him to start and add a GO TO X: ☐ Y: ☐ block right above our loop. If he is in the right starting position the X and Y values should already be populated.
Now each time we press the flag Scratchy should start at the left side of the stage and walk across to the right part of the state.Note: If Scratchy doesn't do anything when you click on him then your X and Y coordinates may have him touching the edge somewhere.
Lab – Step 2: Walk your Character Across the Screen
- Pick a starting backdrop
- Pick a sprite
- Add the blocks (as demonstrated) to make your character walk across the screen
This lab should take approximately 5-10 minutes.
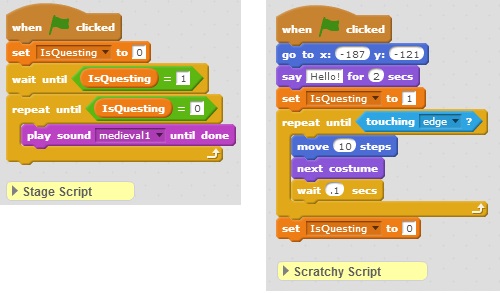
Let's start setting up the backstory for Scratchy's quest. Under Looks there is a block called SAY ☐ FOR ☐ SECS and add it under the position reset in your scripts. In this example we'll have Scratchy say "I solved it! I know where to find the Golden Kitty! I must go at once!" For 5 seconds.
Next, we need questing music! Click on the Stage then Sounds. Click the "Choose Sound from Library" button. Choose Music Loops -> midieval1 and press OK. This makes that sound available for us to use in the Scripts tab of the stage.
Now we want the music to play during the questing, but not before or after so we're going to control the sound by creating a new variable. Click Data then click "Make a Variable". Enter the name "IsQuesting" and press OK. This should create 5 new blocks based on the "IsQuesting" variable.
To get the music loop to function the way we want we'll need to reset the initial state of our variable to 0, wait until it becomes 1 and repeat our music loop until the variable becomes 0 once again. We'll also need to update our Scratchy scripts to set the variables to the appropriate values at the appropriate times. Our blocks should look like this:
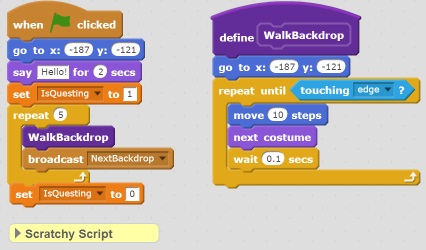
This new block acts kind of like a sub-routine. Each time we use the WALKBACKDROP block, this sequence is executed.
Now we can alter our other Scratchy and replace the code we removed with our custom block. Let's also include a REPEAT ☐ block with a 5 parameter to repeat for each of the backdrops we plan to have Scratchy adventure to.
If we ran the skit at this point Scratch would go across the room 5 times on the same backdrop. We need our backdrop to change. The best way to have that happen is to send a message to the stage to have it switch to the next backdrop. In the events tab, select the BROADCAST MESSAGE1 block and drag it under our custom WALKBACKDROP block in the Scratchy start flag stack. Press the little down arrow and click "new message". Name the new message "Next Backdrop". Scratchy should now look like this:
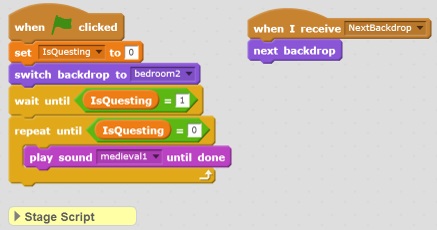
Sending the message is only half the work. Now we need to go to the stage and do something with that message. Add to the stage script a new WHEN I RECEIVE NEXTBACKDROP block followed by a NEXT BACKDROP block. Once that is complete we need to add 4 more backgrounds. Add the backdrops from the library: Brick Wall and Stairs, Castle 5, Water and Rocks, Grand Canyon, Castle 4. Remove any extra backdrops (including the white one we started with) if they are still there. We will also need a Switch Backdrop to Bedroom 2 block added so we start on the correct background when the skit is started. If we did everything right our Stage scripts should look like this:
At this point we have Scratchy walking on 6 different screens.
Lab – Step 3: Create the journey
- Have the character tell their backstory
- Add a sound loop
- Create a WALKBACKDROP custom block
- Send a NEXTBACKDROP message
- Receive the NEXTBACKDROP message
- Pick a series of backdrops
- Add a loop for the number of backdrops containing our new WALKBACKDROP and NEXTBACKDROP blocks
This lab should take approximately 10-15 minutes.
Now all we have to do is create the ending. Unfortunately for Scratchy this isn't going to be a happy ending. Right as Scratchy reaches for the Golden Kitty he's going to be crushed under a rock!
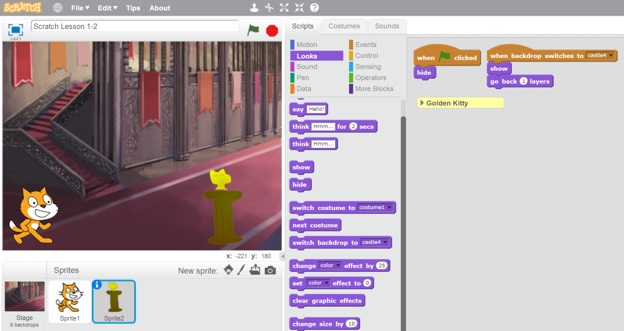
The next thing we want to do is to add an actor / sprite for the Golden Kitty and the boulder. Let's start with the Golden Kitty. We're going to draw our golden kitty so we can show how to use the drawing tools. In the Sprites section press "Create new sprite". You'll notice in the drawing tools that there is a button in the bottom-left corner that says "Convert to vector", let's press it. When we do the drawing tools will swap over to the right side of the screen.
What is the difference between the Vector Mode and Bitmap Mode? Vector art can be manipulated after it's drawn and it also scales up or down without blurriness. Bitmaps are simple images. For Sprites it is often helpful to use Vector art, but it's more work for the computer to display so we want to use them sparingly.
Draw a pedestal and the Idle. Be sure to show how to draw lines, fill shapes. Now that it's drawn the sprite is much too large! Use the shrink tool on the very top bar to shrink it to an appropriate size. We don't want this sprite to show until the final scene so let's add some script to hide it when the start flag is pressed but appear when the final scene is reached.
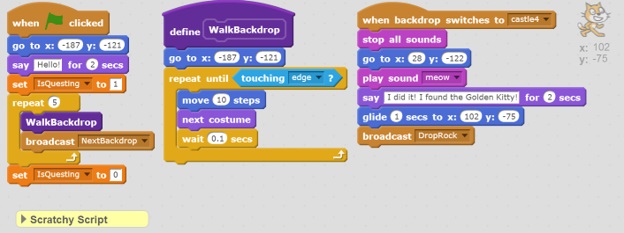
The last thing to do to finish this up is to setup the final scene for Scratchy. Once he enters the last scene we want to say something, move him over to the idol, and trigger the trap!
At this point we're pretty much done. If you have the "IsQuesting" variable on your stage, you can right click to remove it. We could also add some embellishments where when Scratchy walks past particular scenes there could be additional hazards.
Lab – Step 4: Finish the journey 1. Finish the story 2. Add at least one other Actor / Sprite 3. Use a glide block
This lab should take approximately 5-15 minutes.